Step 3: Operational Issues - Unable to Process Properly
Step 3: Operational Issues - Unable to Process Properly
During the laser engraving process, common issues include the laser head moving without engraving, alarms triggering during operation, and the laser stopping immediately after starting. To troubleshoot, check the auto-focus, ensure the blue light and red cross are functioning, and verify the Hall sensor. Also, review engraving parameters and adjust flame sensitivity. If the laser stops at the start, providing a video of the red cross alignment is recommended for diagnosis.
3.1.1 During the machine's operation, the laser head moves but leaves no engraving marks
Issue:
1. During the machine's operation, the laser head moves but leaves no engraving marks
1.Check if the blue light is on, as it indicates that the laser is in working condition. If the blue light is off, the laser might not be activated.
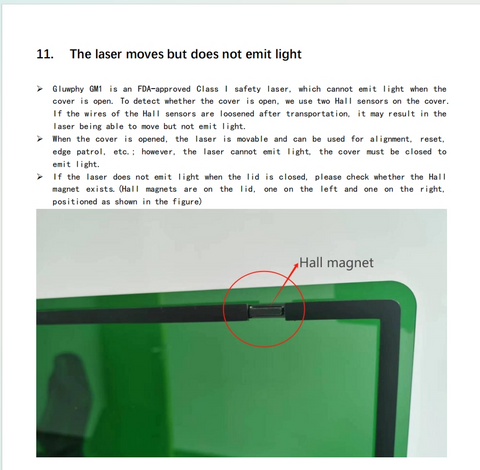
2.Verify if the red cross is displaying and calibrated correctly. If the red cross is not functioning properly, it could be an issue with the Hall sensor, causing the laser to fail in accurate alignment.
If your machine is in state B, you need to fix the Hall problem.
Solution:
- Reconnect the wiring as per the manual: Please follow the instructions in the manual to check and reconnect the lid detector's wiring.
- Install our software patch: We can provide a software patch that, once installed, should resolve the issue.


3.1.2 Check the auto-focus
Ensure the auto-focus is properly set and has been executed correctly. If the laser is not focused at the correct distance, it won’t engrave the material effectively.
3.1.3 Check the parameter settings
Cross-check the engraving parameters (such as power, speed, focus distance, etc.) to ensure they are appropriate for the material being processed.
3.2 The laser head alarms and stops during operation
Issue:
This may be caused by the flame sensor’s sensitivity being too high. Adjust the flame sensor’s sensitivity to prevent false alarms and stop interruptions.
Judgment Video:
Solution1:Reduced sensitivity of flame alarms based on video
Follow the steps in the video to fix it
Solution 2: Flame alarms can be blocked on the software (not recommended for testing purposes only)
How to turn off the flame sensor in LightBurn:


We prefer that you physically reduce the sensitivity of the flame alarm, and shielding the flame alarm on the software allows you to use it to determine whether the flame alarm is caused by a sudden stop during machine movement.
3.3 The laser head stops and alarms immediately after starting from the home position
Issue:The user needs to provide a video showing the red cross alignment for diagnosis. This issue could be related to improper red cross alignment or other sensor-related problems.
Solution: Follow the steps in the video to solve the problem


