3.2 Lightburn Basic setup and software usage
Basic settings in lightburn
3.2 How to Set "Autofocus", “Z-axis reset”, “Z Down 2mm” “Red Cross Offset to Laser” in Lightburn
3.2.1 How to use "Autofocus" function :
- Turn on the "Autofocus" function.
- Select the engraving file, the machine will automatically start focusing after clicking Start, and start engraving after the focus is completed.
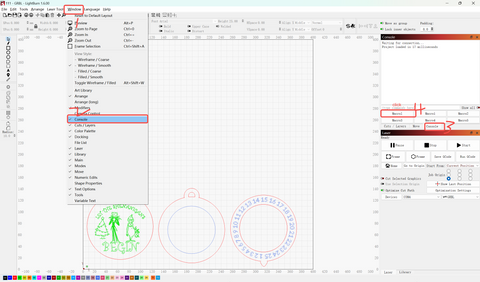

- Select any custom button, right click mouse to pop up the button setting page, enter the name of the button in "Button Label", enter [$HZ] under "Macro contents"
- After clicking OK, a button with the corresponding function will be generated

3.2.2, How to raise the Z-axis to the highest - Z-axis reset
- When you need to engrave or cut a thicker object, you need to raise the z-axis to put the object in, and then you can reset the z-axis.
- Find "Window" in the top navigation bar, and enable "Console" function in the drop-down menu, Just like the steps for autofocus.
- Select any custom button, right click mouse to pop up the button setting page, enter the name of the button in "Button Label", enter [$J=G91 Z100 F200] under "Macro contents

- After clicking OK, a button with the corresponding function will be generated.
3.2.3 How to drop the laser head 2mm
- When you cut thick objects, you can drop the laser head by 2mm, making the focal length drop by 2mm for a perfect cut!
- The steps are the same as before.
- Select any custom button, right click mouse to pop up the button setting page, enter the name of the button in "Button Label", enter [$J=G91 Z-2 F200] under "Macro contents" .

3.2.4 How to set Red Cross Offset to Laser in Lightburn
1, Launch Lightburn and Connect to the device.
2, Go to edit-> Device Settings -> Laser Offset -> Enable Pointer Offset.
3, For GM105 and GM120, fill in -12mm at X and -12mm at Y;For GM110, fill in -12mm at X and - 10.6mm at Y


